
Google forms are great. They allow you to collect information from a huge number of people into one simple spreadsheet and better yet, all for free. In most situations, you want to know who the respondent is, so normally you would make them fill in a “Name” question. This is not ideal, since you actually already know who they are, so it just wastes time for your respondents and risks them giving up.
Here’s how to get Google forms to automatically fill in the known fields.
Contents
Recipient data
Create your recipient spreadsheet. As an example, we will use my test spreadsheet that makes up random dummy data, as it is best to ensure you are comfortable with the process before sending rubbish to all your contacts by mistake!
Ensure that all attributes have easy names in the first row – “name”, “email” etc.
Save your spreadsheet as something easy to remember in either XLS or ODF format.
Google form
Create your Google form. You will need a Google account.
Click the cog.
If you have it, untick the “Restrict to users in [your organisation name] and its trusted organisations” so that you can send it to anyone. If you don’t have this option, or just want to send to colleagues, ignore this step.
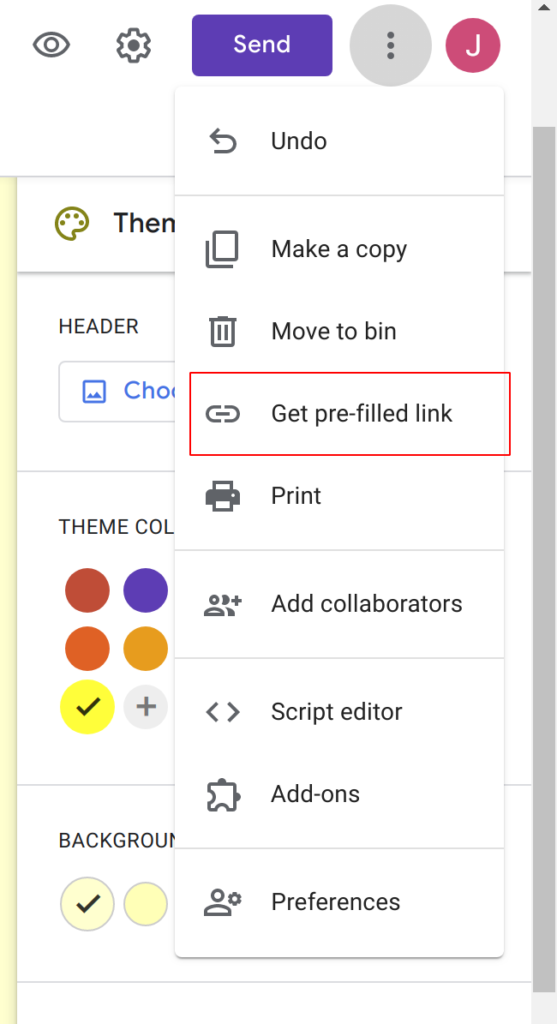
Notice the three vertical dots menu in the top right. Open it.
Click “Get pre-filled link”
Complete the fields that you already have recipient data for using the heading names from your recipient spreadsheet.
Click “Get link”.
Click “Copy link”.
Paste the link into your favourite text editor, such as Notepad or Gedit, just to hold it for a moment.
Thunderbird
Install Thunderbird
Log into your email account.
Add the Mailmerge addon
Create a new email.
Enter your recipient field names in the appropriate places, surrounded by double braces. For example, in the “To” field, you should enter
{{email}}
Do the same in the body of your email, including the variables wherever you need them. For example, I wrote the following email.
To: {{email}}
Subject: Hello {{name}}Hello {{name}},
This is a test. Please RSVP now.
Thanks!
James
Select a word or phrase to use as the hyperlink that you want your recipient to click on to reach your form, also known as a call to action. This could be “RSVP Now” as above, but do not use “click here”; see W3 guidance.
Highlight your call to action phrase.
Click the “Insert” menu.
Click “Link”
Go back to the link in your Notepad.
In the link, you will note that the column names you entered in the form are now in the URL. Surround each of these with double braces, removing any additional + characters where necessary.
For example, your link might look something like this.
https://docs.google.com/forms/d/e/**********/viewform?usp=pp_url&entry.*********={{name}}&entry.*********={{variable}}&entry.*********={{email}}
If your {{variable}} values contain spaces, you will need to replace those spaces with + characters in your spreadsheet. Add another column that allows you to have a separate instance of your data just for this link. You can use SUBSTITUTE in your favourite spreadsheet software to do this.
Copy the whole link.
Paste the link into the “Link properties” box in Thunderbird. Thunderbird will use the data from your spreadsheet to change the link for every single email!
Click “OK”.
Click “File”
Click “Mailmerge”
In “Source”, select “Spreadsheet”. Always test your setup using dummy addresses, such as mailinator before you send to real people.
In “Deliver Mode”, select “Send now”.
Click “Browse” in the “File” field of the “Spreadsheet” section.
Select your spreadsheet.
On the very bottom of the “Mail Merge” box, click “Preview”. Notice that Thunderbird has substituted your variable names for the actual data.
Click “OK” on the preview box.
Life hack!
If you want to randomly vary the time between sending emails, add a “pause” column in your recipient data spreadsheet then use the
=RANDBETWEENformula to set the lower and upper delay bounds in seconds for each recipient. You can then add{{pause}}to the Pause field in the Thunderbird Mail Merge box to tell Thunderbird to pause for the requisite time. This can be helpful if, for example, your email provided has a rate limiting policy.
Click “OK” on the “Mail Merge” box to send your emails.
You will be warned about checking your emails before sending them. Read this carefully and click “Send” if you are happy.
Check mailinator to ensure that all your messages were received correctly, ensuring that your Google forms links work as expected.
If all is well, use your real spreadsheet to send your message to your real contacts!
Conclusion
There are many applications for this process, such inviting friends to a party, requesting feedback, or increasing the response rate on your survey. Everything you do to make life easier for your recipient will help you to get better data from them, so it is well worth the effort!